


Learn how to create a warm, grungy background in Photoshop.
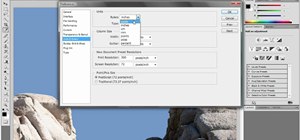
- Open up a brand new document at 1280 x 720.
- Fill the document with a muddy brown color.
- Using the elliptical tool, creates a shape in the center.
- Go to Layer -> Adjustment layers -> Levels and click okay.
- Grab the black slider on the bottom of the levels gradient which is going to give you a nice glow in the center.
- Set the levels adjuster to Overlay.
- The next thing is to bring in a texture. It can be any texture you want, the image being used here is a metal texture.
- Command J to duplicate the layer.
- Copy and paste the texture on top of the original document so that it is placed on top.
- Change the level adjuster to Soft Light.
- Add -> New Adjustment Layer -> Curves
- You can darken things up by playing around with the curves which will affect the light and dark spots.
- Create brand new layer and name it "Trees"
- Go to brushes and set the foreground color to white.
- You can download different brushes to use for this and would load into brushes tool.
- Place the brushes anywhere on the document.
- Set level adjustment to Overlay.
Just updated your iPhone? You'll find new emoji, enhanced security, podcast transcripts, Apple Cash virtual numbers, and other useful features. There are even new additions hidden within Safari. Find out what's new and changed on your iPhone with the iOS 17.4 update.


Be the First to Comment
Share Your Thoughts